How to Create Loft Spaces in RoomSketcher
Have you been looking for a way to create a loft space in RoomSketcher, and found this a bit challenging? Not to worry, here is a quick and easy way for you to create your new space!
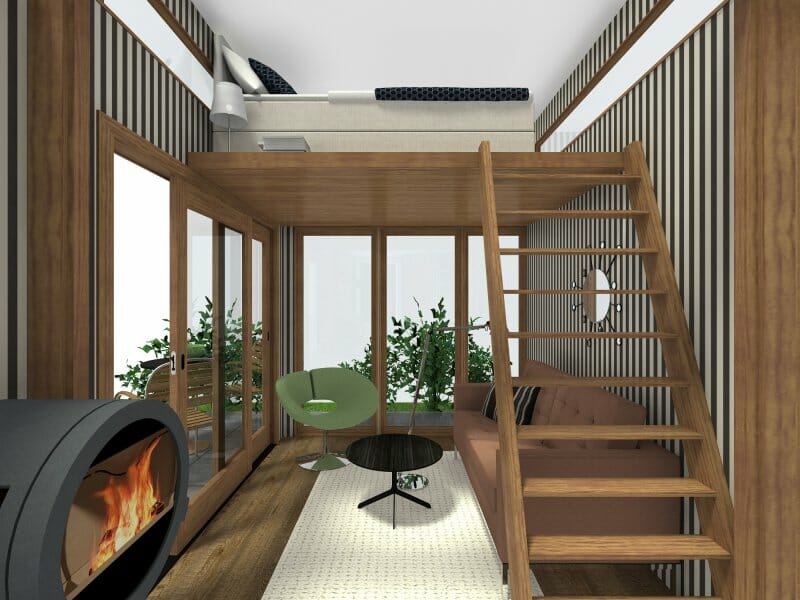

When creating loft spaces with the RoomSketcher App, we use different items from the furniture selection. By changing the dimensions of these items, it’s possible to create a functional and fabulous loft space that is ready for you to furnish!
After you have drawn up the floor plan of your room or house, decorate and furnish the main floor, as the loft should be the last part of your design to be created.
Start With a Building Block
To create the floor for your loft space you can for example use a building block, here’s how to do it:
- Click the Furniture tab and search for Building Block.
- Choose the block with your preferred finish, and drag and drop it into your floor plan.
- Right click on the Building Block and click on Properties.
- In the dialogue box you will be presented with several options for different measurements: width, depth, height, and height above floor.
- In here you should apply the measurements you want for the floor you’re creating. Width and Depth will be the actual size of your loft, while Height will be the height of the floor. In height above floor will need to apply the height where you want the floor to start.
Once all this is done, you’ve successfully created the floor of your loft!

Learn more - create half walls.
Half walls can easily be crated in RoomSketcher, either by customizing items from the furniture library, or by creatively adjusting different wall types.
Pillar Support
Now, if you would like to visualize the loft with pillars supporting it, you can for example use columns:
- In the Furniture tab, search for Column and drag and drop the column you want into the floor plan.
- Right click the column and click on Properties.
- In the Properties window you can change the width and depth of the column so that it works for your loft floor.
- Simply slide the column in under your loft floor, and you can take a snapshot to see what it will look like.

Railing Alternatives for Loft Spaces
Columns and beams
If you want a railing on your loft floor, this can be created in many different ways. You can use Columns and Beams:
- Search for Column in the Furniture tab and drag and drop your chosen column into the floor plan.
- Right click the column and click Properties.
- In the Properties window, you can adjust height, width, depth and height above floor.
- Place the column where you want it on the loft floor.
- Search for Beam in the Furniture tab and drag and drop the beam with the finish you want into the floor plan.
- Adjust the width, depth, height and height above floor so that it fits the measurements of your loft floor.
- Place the beam on top of the columns to make a complete railing.

Glass railing
Or you can make a glass railing:
- Search for Shower Wall in the Furinture tab and drag and drop the item into the floor plan.
- Right click the shower wall and click Properties.
- In the Properties window, you can adjust height, width, depth and height above floor.
- Place your new glass railing where you want it on the loft floor.

Tiles
Or you can use tiles, if you want the loft to be more closed off and private:
- Search for Tiles in the Furinture tab and drag and drop the tiles with your prefered finish into the floor plan.
- Right click the tiles and click Properties.
- In the Properties window, you can adjust height, width, depth and height above floor to match your loft space.
- Place your tile railing where you want it on the loft floor.

Access to the Loft Space
The last step when creating a loft space is to visualize how you’ll actually get up to this new floor you’ve created. If you need stairs leading up to it, this is easy to do!
- Click the Windows etc. tab and search for stairs.
- Choose the type of stairs you want to use and drag and drop it into your drawing.
- Place the top of the stairs where you want it to hit the loft.
- Right click on the stairs and click on Properties. Here you can adjust the height of the stairs to match the height of your floor, and the width to match it to the width you need.
- In the same window, make sure you’ve chosen Above floor in the Type dialog box so that your stairs are in the right place.

Try it Yourself
So, there you have it, a quick and easy way to create a loft in the RoomSketcher App. Once this is done, you’ll be ready to decorate and furnish the space just like you’ve always wanted!
Don't forget to share this post!
Recommended Reads
How to Create Half Walls in RoomSketcher
Half walls can easily be created in RoomSketcher, either by customizing items from the furniture library, or by adjusting different wall types.

From Patios to Pools: The Best Outdoor Living Space Ideas
RoomSketcher home design software isn’t just for indoors. You can create outdoor designs too! Get inspired and learn how to create outdoor areas, decks, patios, pools, yards, and gardens now.
How to Create Sloped Ceilings
Create floor plans and home design projects with sloped or cathedral ceilings. Discover our favorite sloped ceiling hints and tips to get you started fast.