How to Make a Lighting Plan in 7 Steps
A lighting plan helps you decide where lights go and how they should work in your space. In this guide, you’ll learn how to plan your layout step by step.

Article Summary:
A lighting plan maps out where lights go, what type to use, and how they are controlled. It helps you avoid dark areas, support different activities, and create a balanced layout.
The process includes defining where light is needed, placing fixtures based on layout and furniture, and organizing lighting into zones with clear controls.
Lighting can completely change how a space looks and feels. But without a clear plan, it’s easy to end up with dark corners and harsh lighting.
A lighting plan helps you think it through before anything is installed. It shows where your lights go, what type to use, and how everything works together.
In this guide, you’ll learn how to create a lighting plan step by step.
What is a Lighting Plan?
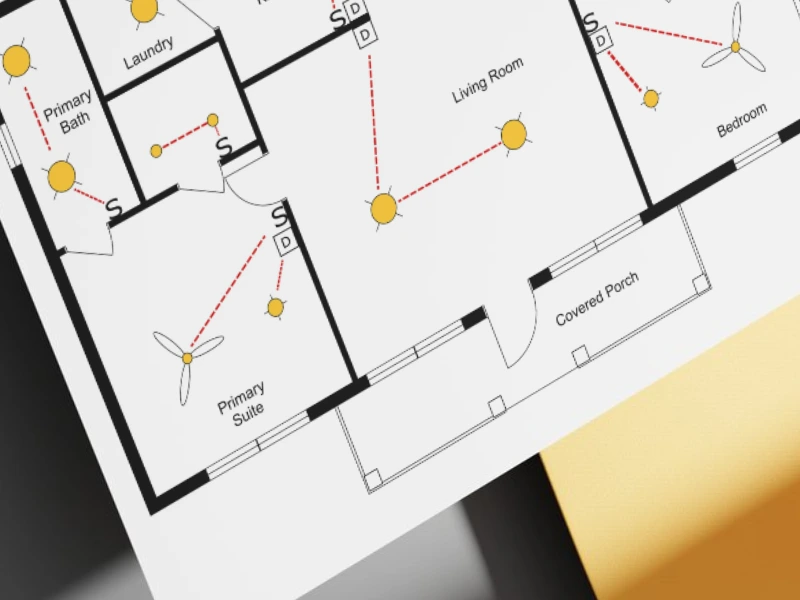
A lighting plan is a visual layout that shows where lights are placed in a space, along with how they are controlled.
It’s usually built on top of a floor plan and includes:
- Light fixtures and their locations
- Types of lighting used
- Switches and control points
- Lighting zones or circuits
Why a Lighting Plan Matters
Good lighting shapes how a room feels and how well it functions day to day.
A clear plan helps you:
- Make sure every area is properly lit
- Avoid dark spots and glare
- Support how the space is actually used
- Create different moods for different moments
Without a plan, lighting decisions often happen too late, which can lead to awkward placements.
Types of Lighting to Include
Most rooms need more than one type of lighting to feel comfortable. Instead of relying on a single ceiling light, you want to layer different light sources.
General lighting gives you overall visibility so you can move around safely. This is usually your ceiling lights or recessed lighting.
Task lighting is more focused. It helps you see clearly when you’re cooking, working, or reading. Without it, you’ll often end up working in your own shadow.
Accent lighting adds depth. It highlights features like artwork, shelves, or textures and makes the space feel more complete.
Decorative lighting brings personality into the room. Pendant lights, table lamps, and statement fixtures can all contribute to the overall look.
If you want more flexibility, you can also include smart lighting. This lets you adjust brightness and color depending on the time of day or activity.
How to Create a Lighting Plan with RoomSketcher
1. Start with your floor plan
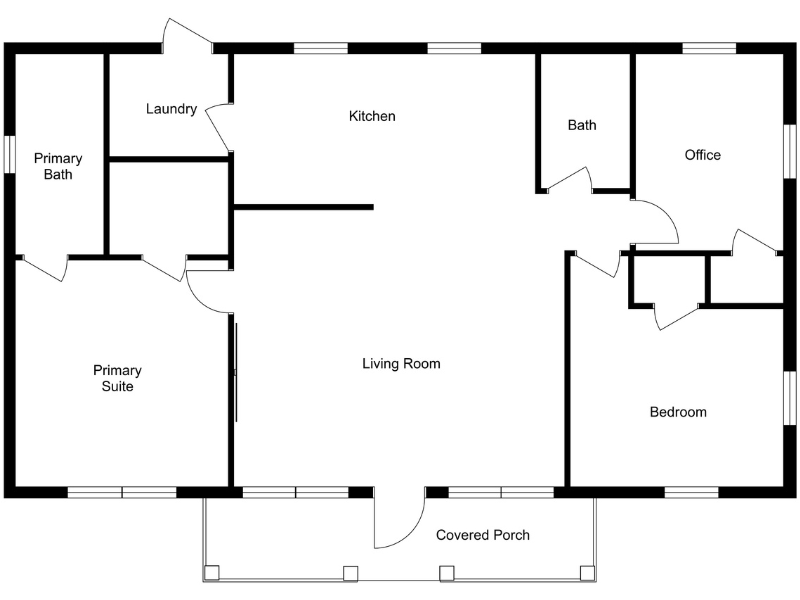
Every lighting plan starts with a floor plan. It gives you the structure you need to place lights in the right spots and avoid guesswork later.
If you don’t already have one, simply create it first. With RoomSketcher, you can draw your layout from scratch, trace over an existing plan, upload and convert a floor plan using AI, or order floor plans from our expert illustrators.
Once your floor plan is in RoomSketcher, adding elements such as furniture and symbols is easy.
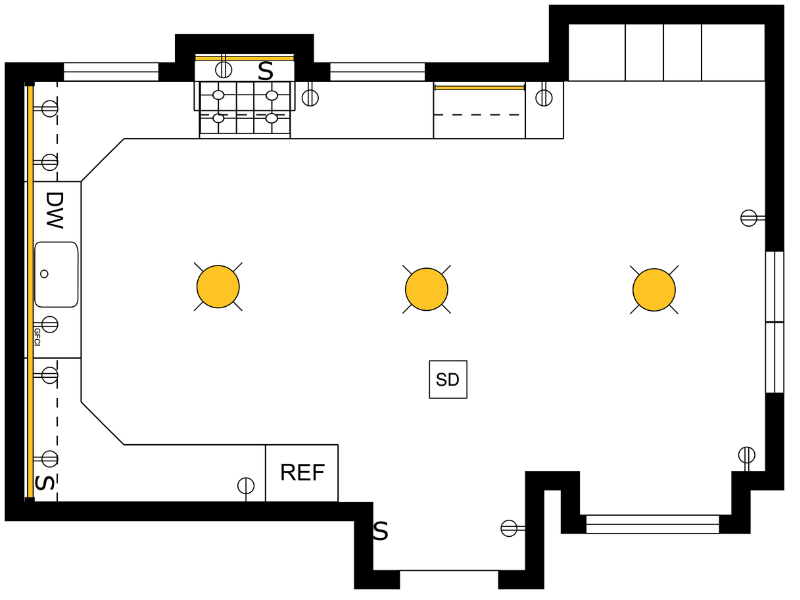
2. Mark fixed elements and structural features
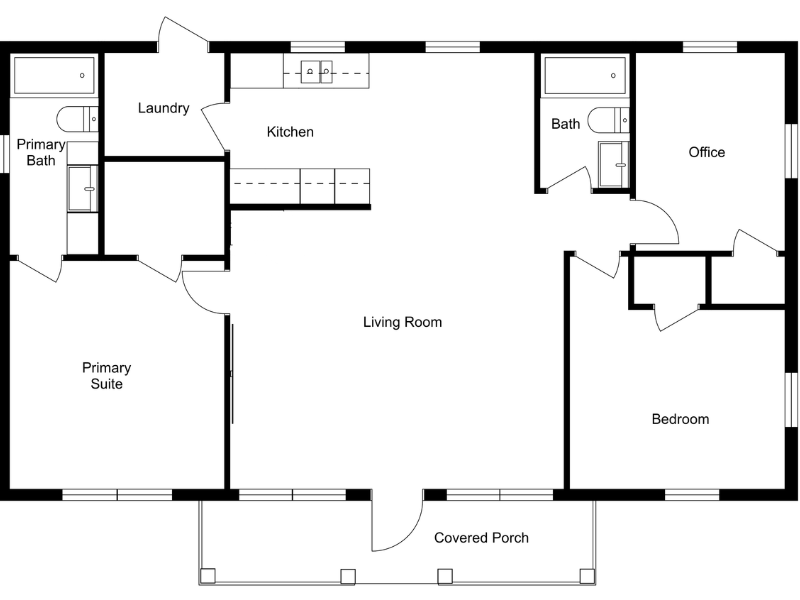
Next, add everything that can’t be moved.
This includes things like:
- Kitchen layouts and built-in cabinets
- Fireplaces
- Columns or beams
- Stairs
- Bathroom fixtures
These elements define your constraints. They affect where lighting can be placed and where it needs to be stronger.
For example, a kitchen counter or sink will always need proper task lighting.
3. Add furniture

Now bring in your furniture.
This is where the plan starts to reflect real use. Lighting should support how people move, sit, work, and relax in the space.
Instead of thinking in terms of the whole room, start thinking in zones such as seating area, dining area, work area, and circulation paths.
4. Define where light is needed
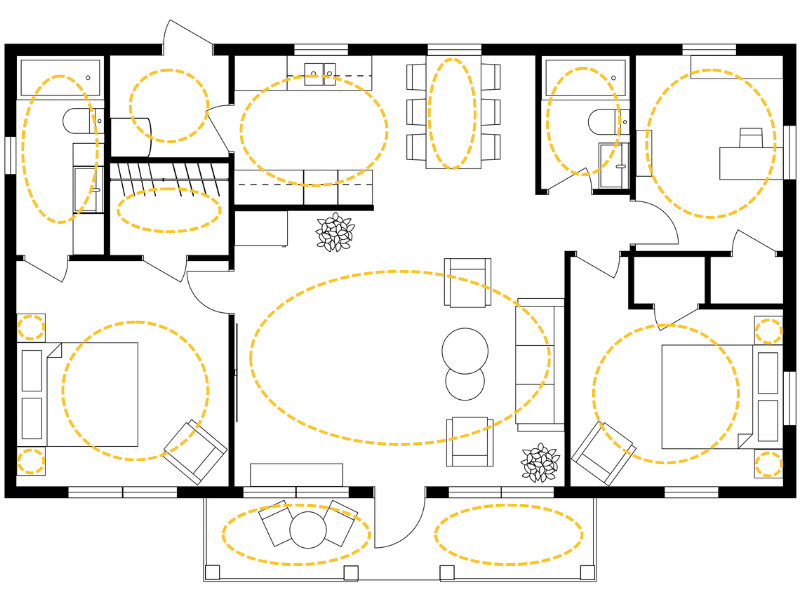
Now look at your layout and identify where light is actually needed.
Instead of thinking about lighting types, focus on the space itself. Where do you need light to see clearly, move safely, or feel comfortable?
Start by marking key areas:
- Seating areas where you relax
- Work surfaces like kitchen counters or desks
- Walkways and transitions between rooms
- Feature areas like shelves, artwork, or architectural details
Each of these areas has different lighting needs.
A sofa area usually needs softer, layered light that feels comfortable over time. A kitchen counter needs brighter, more focused light so you can work without shadows. A hallway should have even, consistent lighting to guide movement safely.
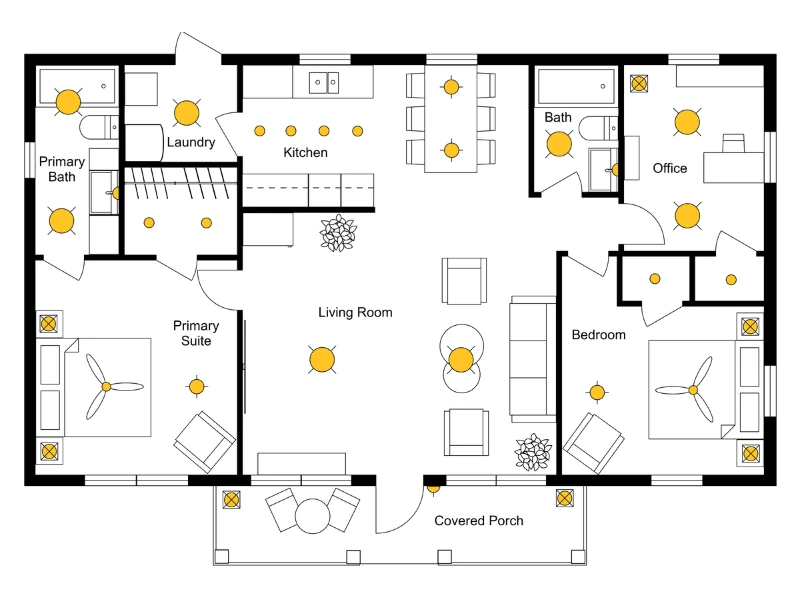
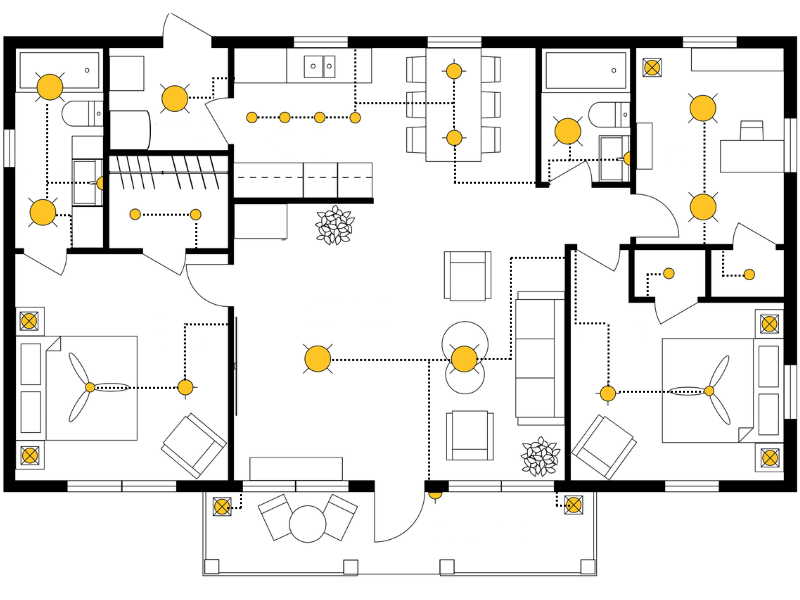
5. Place your light fixtures
Now you can start placing fixtures on your plan.
First focus on key zones like work surfaces, seating areas, and walkways. Then build out the rest to create even coverage.
Keep spacing consistent where possible, but don't aim for perfect symmetry. Lighting should follow how the space is used, not just the shape of the room.
Also pay attention to how furniture interacts with light. A poorly placed fixture can easily create shadows where you don't want them.
6. Plan switches and lighting zones
Think about how you'll control the lighting in everyday use.
Lights should be easy to reach when entering a space, and grouped in a way that makes sense.
For example, you might want separate controls for:
- General ceiling lighting
- Task lighting
- Accent lighting
Adding dimmers gives you more flexibility and helps you adjust the mood throughout the day.
7. Review and adjust your plan
Before finalizing anything, take a step back and look at the full layout.
Check for:
- Underlit areas
- Overly lit areas
- Fixtures that don't align with how the space is used
This is your chance to fix small issues before they become expensive ones.
Practical tips for Better Lighting Plans
Think about balance
A room should feel evenly lit, without harsh contrasts between bright and dark areas. If one side of the room feels heavier, add light there instead of increasing brightness everywhere
Layering is key
Relying on a single light source rarely works well. Combine ceiling lights with floor lamps, wall lights, or under-cabinet lighting to create depth and flexibility.
Utilize natural light
Natural light should be a part of your plan. Pay attention to how sunlight moves through the space during the day, and use artificial light to support it, not compete with it.
Add dimmers
Dimmers are one of the simplest upgrades you can make. They let you adjust the lighting depending on the time of day or activity, which makes the space feel more comfortable.
Think about maintenance
Make sure fixtures are accessible and practical to clean or replace. A lighting plan should work long-term, not just look good at the start.
Choose the right color temperature
Light color has a bigger impact than most people expect. Even with the right placement, the wrong color temperature can make a room feel off.
Warm light feels more balanced and is often a good choice for kitchens or workspaces where you need clarity without harshness.
Cooler light can feel bright and crisp, but it can also feel too sharp in spaces meant for relaxing.
Try to stay consistent within each room, and avoid mixing very different tones unless you have a clear reason to do so.
Common Mistakes to Avoid
One of the most common mistakes is relying on a single ceiling light. This often leaves parts of the room underlit and doesn’t support different activities.
Another is placing lights without considering furniture. This can create shadows in the wrong places or leave key areas without enough light.
Ignoring natural light is also a missed opportunity. Daylight changes throughout the day and should influence how you place artificial lighting.
Using the wrong color temperature can make a space feel uncomfortable, even if everything else is correct.
Switch placement is another detail that’s easy to overlook. If switches aren’t where you expect them to be, it quickly becomes frustrating in everyday use.
Finally, not planning enough flexibility can limit how the space works over time. Adding zones or dimmers makes it much easier to adjust lighting as your needs change.
Frequently Asked Questions
A lighting plan shows where lights go and how they function in a space.
A reflected ceiling plan is more detailed and focuses on the ceiling itself, including structure, materials, and exact fixture specifications.
For most home projects, a lighting plan is enough to guide decisions and communicate clearly. Reflected ceiling plans are usually used in more technical or large-scale projects.
The number depends on room size, ceiling height, finishes, and required brightness.
Usually no. Most rooms work best with layered ambient, task, and accent lighting rather than only ceiling spots.
Switches should be placed near entry points so you can easily turn lights on when entering and off when leaving a room. In larger spaces or rooms with multiple entrances, it’s often helpful to add switches in more than one location.
Dimmers work best in areas where you want flexibility, such as living rooms, bedrooms, and dining areas. They let you adjust the brightness depending on the time of day or activity.
Yes, if you use software like RoomSketcher, you stay in control of the lighting plan and can easily add, remove, and switch around symbols without rework. This keeps updates flexible even as the project evolves, unlike fixed paper plans or post-install changes that require electrician visits.
Create Your Lighting Plan with RoomSketcher
You don’t need complicated design software to create a lighting plan.
With RoomSketcher, you can work directly on your floor plan and place lighting exactly where you need it.
The tools are easy to understand, so you can get started quickly and build a plan that actually makes sense.
Related Articles
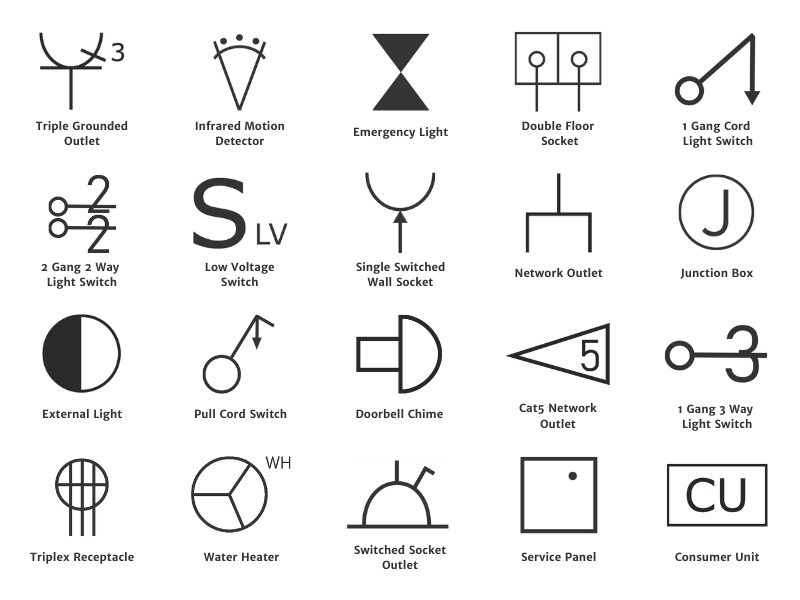
Complete Guide to Electrical Symbols and Abbreviations
What are electrical symbols, and what do they mean? Where are they placed on a floor plan, and what are the regulations for placing them? Here's everything you need to know about electrical plans.
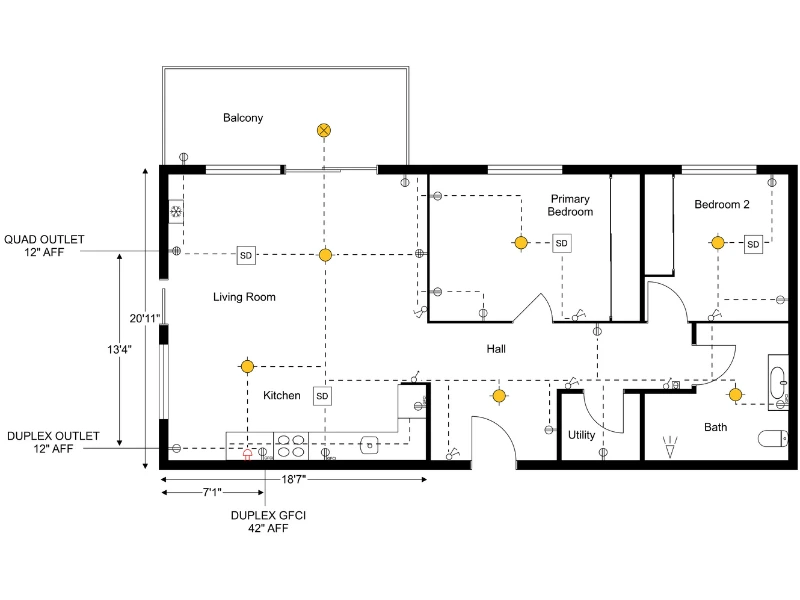
How to Draw an Electrical Plan with RoomSketcher
Learn how to draw an electrical plan step by step. This guide shows how to place lighting, outlets, and switches clearly on your floor plan so the layout is easy to understand and share.
How to Create a Reflected Ceiling Plan
A reflected ceiling plan helps you organize everything that happens above a room. It shows where lighting, ventilation, and other ceiling elements should be placed so the layout works both visually and technically.