How to Draw an Electrical Plan with RoomSketcher
Creating an electrical floor plan is an important part of planning your space. It helps make sure your lighting and power are set up safely and work the way you expect. With the RoomSketcher app, putting together a clear and accurate plan is easier than you might think.

Article Summary:
An electrical plan maps the placement of lighting, outlets, switches, and panels to ensure safe and efficient power distribution. By starting with a complete floor plan and adding standardized symbols, you can create a clear layout that supports installation, inspection, and future maintenance.
Planning your electrical layout can feel like a big task. You need enough lighting, enough outlets, and everything placed in the right spot. At the same time, you want the plan to be clear for your contractor or electrician.
With the RoomSketcher app, you can create a detailed electrical plan directly on top of your floor plan. It’s a straightforward process, and once you see everything visually, decisions become much easier.
Let’s walk through how it works.
In this article:
What Is an Electrical Plan?
An electrical plan is a scaled drawing that shows where outlets, switches, lights, and wiring are placed in a building. It gives a clear overview of how the electrical system is laid out within the space.
Electricians, contractors, and homeowners use it to understand how power and lighting should be installed. A well-designed electrical floor plan helps make sure everything is placed correctly, works efficiently, and meets safety requirements.

Why Create an Electrical Plan?
Electrical plans play an important role in both new builds and remodeling projects.
First, they give electricians and contractors a clear guide for where to place outlets, switches, fixtures, and wiring. This helps ensure the installation is accurate and follows safety codes and standards.
They also make it easier to coordinate with other systems, like plumbing and HVAC, so everything fits together without conflicts.
Electrical plans help with budgeting and planning, too. You can estimate costs, order the right materials, and schedule the work more efficiently.
Later on, they’re useful for troubleshooting and maintenance. With a clear layout of the system, it’s easier to find and fix issues.

How to Create an Electrical Plan with RoomSketcher
RoomSketcher is an easy-to-use software that lets you create detailed and accurate electrical plans. You can draw in 2D and view your project in 3D. Use drag-and-drop tools and a standard set of electrical symbols to place outlets, switches, lighting, and other components exactly where you need them.
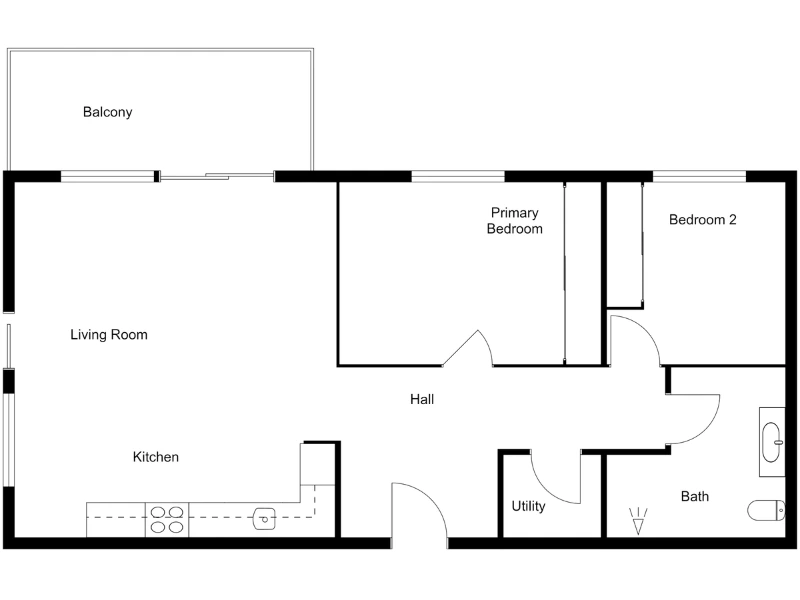
Step 1: create or import your floor plan
Before adding electrical details, make sure your floor plan is complete. With RoomSketcher, you can draw your plan from scratch, scan your property using iOS LiDAR, trace over an existing plan, convert an image, or order floor plans from our redraw service.
Walls, doors, windows, and fixed installations should already be in place. These elements affect where lights and outlets make sense.
Here’s what a clean base plan might look like:
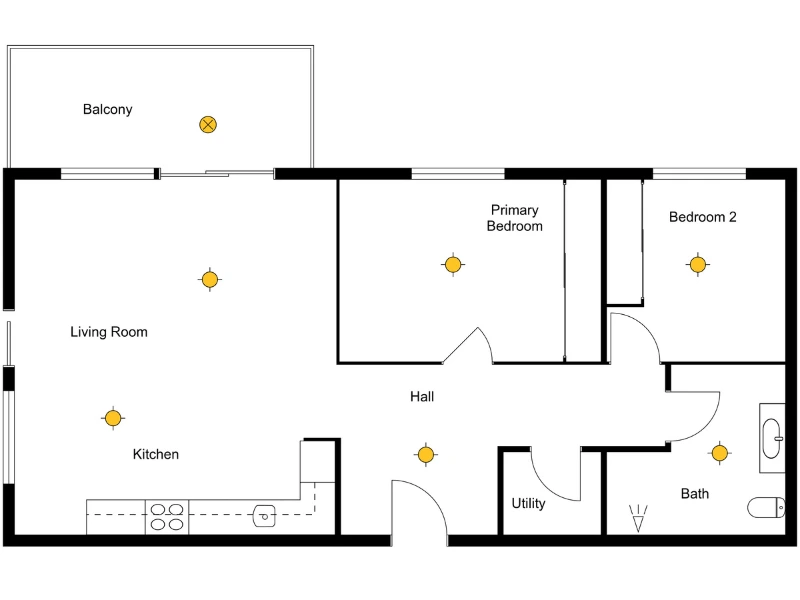
Step 2: add lighting fixtures
Start with lighting, since it defines how a room feels.
Open the symbol library and place ceiling lights, wall lights, recessed lights, or exterior lighting where needed. Think about how the room will be used. A kitchen may need both general lighting and focused task lighting. A hallway may need evenly spaced fixtures for consistent visibility.
As you place lights, consider movement through the space. Imagine walking into the room at night. Where would you expect the light switch to be? Where would you want the light source?
Step 3: add outlets and switches
Once lighting is in place, add outlets and switches.
Place outlets along walls where furniture and appliances will likely sit. Think about charging phones, plugging in lamps, and powering kitchen equipment. Avoid placing outlets where cabinetry or large built-ins will block them.
Switch placement matters just as much. Position switches near doorways and in logical locations based on how people enter and move through the room. For larger rooms or staircases, you may need switches at both ends.
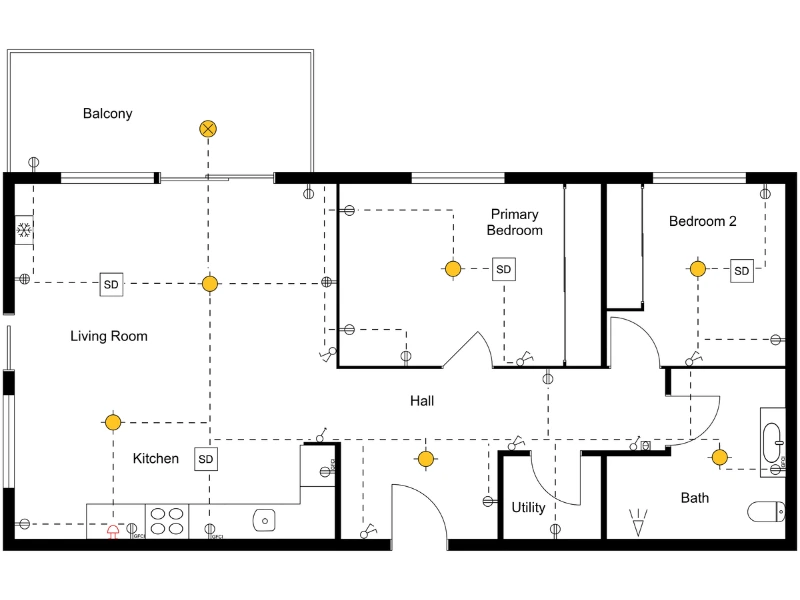
Step 4: add notes and measurements
Add text labels where clarification is needed. This can include circuit numbers, panel references, or special requirements such as dedicated appliance circuits or exterior connections.
You can also use notes to explain switch control, like which lights are connected to which switch, or to mark dimmers, three-way switches, or smart controls.
Measurements are just as important. Showing distances between outlets, fixture spacing, or panel clearances helps confirm the layout meets local building codes and safety standards. It also makes installation more precise.
Step 5: export and share your plan
When you are satisfied with the layout, generate a 2D Floor Plan. You can export it as a PDF, download it as an image, or print it to scale.
Sharing a clear electrical plan ensures that everyone involved in the project understands the layout before installation begins.
Common Mistakes to Avoid
Even simple projects can run into problems if details are overlooked. A few common mistakes include:
- Placing too few outlets, especially in living areas and kitchens
- Positioning switches behind doors or in awkward locations
- Forgetting exterior lighting near entrances and walkways
- Overloading a single circuit with too many appliances
- Skipping clear labels for switches, circuits, or panels
It’s also important to have a licensed electrician review your plan before installation to ensure it meets local building codes and safety requirements.
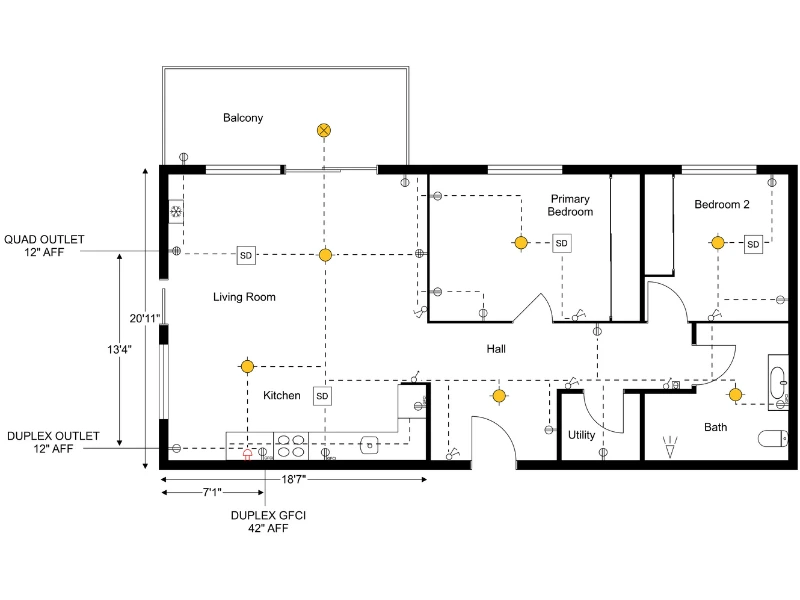
Use Examples and Symbols to Save Time
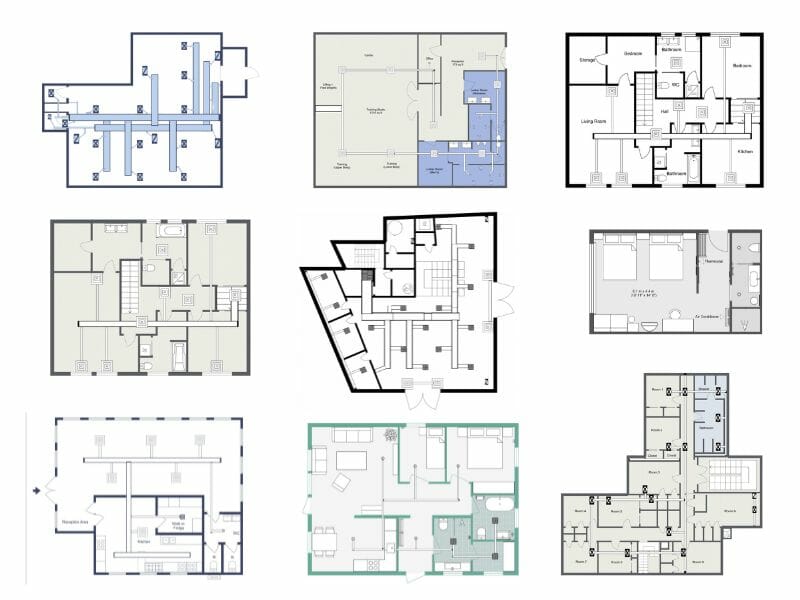
If you’re unsure where to start, it helps to look at real electrical plan examples first. Seeing how lighting, outlets, and panels are laid out in different spaces can give you a clear starting point and help you avoid missing important elements.
Take a look at our electrical plan examples to see how different layouts are put together, then build your own layout in the RoomSketcher app based on your floor plan.

The symbol library makes the process straightforward. Inside the RoomSketcher app, you’ll find a wide range of electrical symbols for outlets, switches, lighting fixtures, appliances, and more. Simply drag and drop the elements onto your plan and adjust them to match your layout.
Each symbol follows standard conventions, so your plan is easy for contractors and electricians to read. You simply drag and drop the elements onto your floor plan and position them where needed.

Frequently Asked Questions (FAQ)
An electrical floor plan typically includes details and information about the electrical layout of a building or space. It encompasses placing and arranging electrical fixtures, outlets, switches, lighting, wiring, circuits, and other electrical components.
Additionally, an electrical plan drawing may include symbols and annotations indicating the locations of junction boxes, panels, transformers, and other relevant equipment. The plan serves as a blueprint for electricians and contractors, guiding the installation and implementation of electrical systems within the structure.
Electrical outlets should be strategically placed throughout a building or space to provide convenient access to power where needed. Outlets are commonly positioned along walls, about 12 to 18 inches above the floor level for standard residential installations. They should be evenly distributed throughout each room, ensuring no area is left without a reachable outlet.
Specific placement considerations may include placing outlets near workstations, countertops, or areas where electrical appliances or equipment will be used. Code requirements and local regulations may also dictate minimum outlet spacing and placement in certain areas, such as kitchens, bathrooms, and outdoor spaces, for safety and compliance purposes.
The three main types of electrical floor plans are lighting plans, power plans, and reflected ceiling plans. To achieve desired illumination levels and aesthetics, a lighting plan focuses on the placement and arrangement of lighting fixtures, including recessed lights, pendant lights, and sconces.
A power plan details the location of electrical outlets, switches, and circuitry, ensuring convenient access to power sources throughout the space.
Lastly, a reflected ceiling plan showcases the positioning of lighting fixtures, HVAC vents, and other ceiling-mounted elements, providing a comprehensive view of the ceiling layout and how it integrates with the electrical system. These three types of electrical floor plans work together to create a well-designed and functional electrical system within a building or space.
Yes. If you already have a floor plan, you can add electrical elements directly on top of it. Start with the layout of walls, doors, and windows, then place lighting fixtures, outlets, switches, and other electrical symbols where needed.
If your floor plan is an image or PDF, you can convert it into an editable project first using AI Convert. This turns your existing layout into an editable floor plan so you can easily add electrical symbols and adjust the layout as needed.
Create Your Electrical Plan With RoomSketcher
You don’t need complex software to create a clear and organized electrical plan.
With RoomSketcher, you can start with your floor plan and use the built-in electrical tools to place lighting, outlets, and switches exactly where you need them. Everything appears directly on your layout, so it’s easy to see how the electrical elements fit within the space.
Move symbols, adjust placements, and refine your layout in seconds. When you’re ready, generate a professional plan you can share with electricians, contractors, or clients.
Recommended Reads
Electrical Plan Examples to Kick-Start Your Project
Electrical plans show where outlets, switches, lighting, and other electrical elements should be placed within a space. In this article, you’ll find a collection of electrical plan examples for different rooms and building types, along with practical tips to help you plan your own layout.
From Simple to Complex: HVAC Plan Examples for Every Project
Are you looking to improve the efficiency of your heating, ventilation, and air conditioning (HVAC) system? The key to achieving optimal efficiency lies in designing a well-planned HVAC system that considers your space's unique needs and characteristics
Complete Guide to Electrical Symbols and Abbreviations
What are electrical symbols, and what do they mean? Where are they placed on a floor plan, and what are the regulations for placing them? Here's everything you need to know about electrical plans.