Polycam vs RoomSketcher: Which Is the Most Accurate at Capturing?
Choosing between Polycam and RoomSketcher for capturing spaces and creating floor plans? Both tools can generate layouts, but they are built for different workflows.


✍️Article Summary: Polycam is a general-purpose 3D capture tool that includes floor plans among its options. It's a reasonable choice for capturing existing spaces and documenting measurements and other technical data. RoomSketcher offers a more complete and user-friendly solution for creating, editing, and presenting floor plans. With flexible ways to start a project and powerful customization tools, it's better suited for design, real estate, and renovation use cases.
Polycam and RoomSketcher are popular tools for capturing spaces and creating floor plans. We looked at usability, outputs, and accuracy to give you a comprehensive guide.
📃Table of Contents:
Side-by-Side Comparison
| Feature | Polycam | RoomSketcher |
|---|---|---|
| Capture Interior | Yes | Yes - with FloorCapture |
| Capture Door Swing | - | Yes |
| Editing Capabilities | Yes - Limited | Yes - Extensive |
| 2D Floor Plans | Yes | Yes |
| 3D Floor Plans | Yes | Yes |
| 3D Visualizations | Yes - Photos + 3D mesh | Yes - 3D Photos, 360 Views, Live 3D |
| Site Plans | - | Yes |
| Measurements | Yes | Yes |
| Total Area Calculations | Yes | Yes |
| Customization | Yes | Yes |
| Branded Floor Plans | Yes | Yes |
| Customizable Templates | - | Yes |
| Cloud Storage | Yes | Yes |
| Furniture Library | Yes | Yes |
| 2D Symbols | Yes - Limited | Yes - Library + Add your own |
| Sharing | Yes - PDF, PNG, DXF, SVG, CSV, etc | Yes - PDF, JPG, PNG, and presentation link |
| Customer Support | Yes - Email, Limited Help Center, Personalized onboarding sessions, Training, and priority support on enterprise plans | Yes - Chat, Email, Extensive Help Center, 1:1 training for businesses |
| Learning Resources | Yes - Tutorials | Yes - Tutorials and webinars |
| Pricing Flexibility | - | Yes - Free, Pro, Team, Pay-as-you-go |
How Do They Work?
Both Polycam and RoomSketcher allow you to capture spaces and turn them into floor plans.
RoomSketcher is a complete floor plan solution for creating and visualizing layouts. It gives you multiple ways to start a project, so you're not limited to working with an existing space. You can capture a layout using the FloorCapture app, trace a blueprint, use AI Convert, draw from scratch using templates and tools, or order floor plans through the redraw service. This flexibility is especially useful for renovations, future construction, or early-stage design work where no physical space exists yet.
Once your project is created, you can edit, customize, and generate outputs like 2D and 3D floor plans, 3D Photos, and interactive walkthroughs, all within the same platform.
Polycam, on the other hand, is a general-purpose 3D capture tool in which floor plans are just one of several outputs. To create a floor plan, you must first capture an existing space. Polycam processes this capture into a floor plan that can then be reviewed and edited.
Polycam's workflow is capture-first and limited to real-world spaces. While it includes basic editing tools, many users export their projects to CAD or other software for further editing and visualization.
💻Platform Availability:
Polycam
- Polycam app with LiDAR-enabled iPhone and iPad for floor plan capture
- Polycam app or Web interface for viewing and editing
RoomSketcher
- FloorCapture app for LiDAR-enabled iPhone and iPad
- RoomSketcher desktop app (Windows and Mac) or tablet apps (iPad and Android) for editing
Capture Accuracy
Both tools rely on LiDAR capture, which works best in good conditions with clear layouts and minimal clutter.
In our testing, both tools generally captured:
- A good portion of a room's shape and layout
- Some door and window placement, including door swing direction with FloorCapture
- Basic furniture
- Basic measurements
Most captures require cleanup and a review of the measurements. This makes editing an important part of the workflow.
Capture and Processing Time
Capture time is similar for both tools, typically a few minutes per room or 5-15 minutes for a medium-sized property.
After capture:
- FloorCapture processes the layout quickly and instantly makes it available for editing in the RoomSketcher app
- Polycam offers on-device processing or cloud processing. Polycam's Space mode processing took much longer than their Floorplan mode
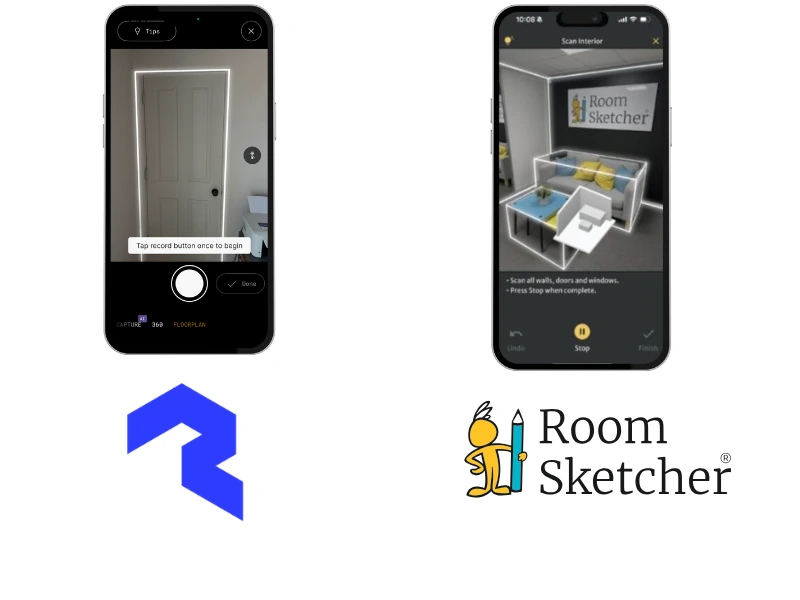
Capture Workflow
RoomSketcher keeps the capture process simple. You open the FloorCapture app, choose a few basic settings, and capture the space. Once complete, the project is quickly processed and ready to edit on a computer or tablet.
Polycam offers a more technical workflow, and its user interface is more complicated because it is a general-purpose 3D capture tool. For capturing buildings, you choose between Floorplan mode and Space mode (which includes 3D mesh data).
Additional settings provide more control but also add complexity. Once complete, you can edit on your mobile device, or you must remember to sync if you plan to edit on a computer. We found we preferred to sync because editing was challenging on a small phone screen.
Editing Capabilities
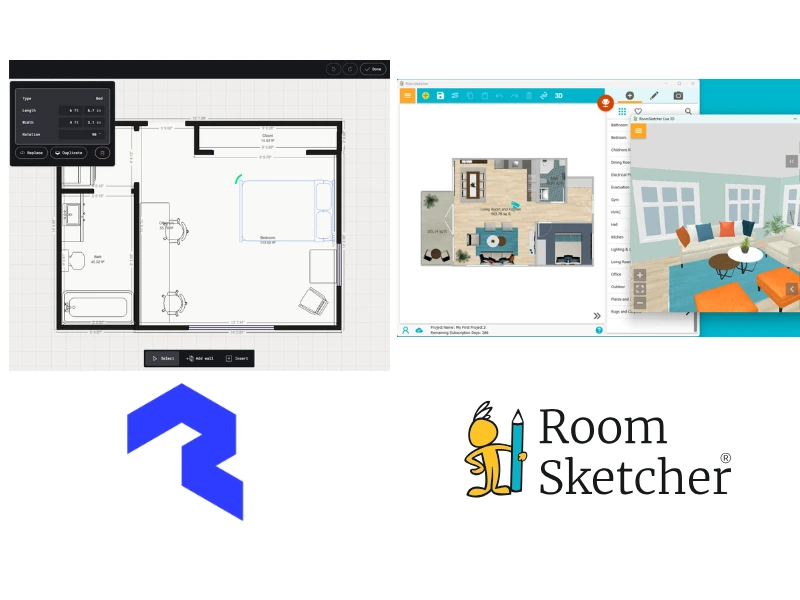
Both companies provide editing capabilities after a capture, but the depth of editing differs significantly.
With RoomSketcher, your project opens in a full-featured floor plan editor where you can edit in 2D while seeing results in 3D. You can adjust layouts, apply materials, add furniture, and generate outputs without leaving the platform. It's clear that the drag-and-drop tool interface has been perfected and includes many features to make floor plan editing easy.
With Polycam, the editing tools are limited and focused on small edits to captured data (e.g., adding or moving a wall or piece of furniture). You edit in 2D, then save and toggle to 3D mode, making it more cumbersome to see how edits affect the 3D floor plan. More advanced edits or visualizations often require exporting to CAD or other software.
Both tools allow you to:
- Adjust walls, windows, doors, and edit room names
- Output 2D and 3D floor plans
- Add your logo for branding (higher-level subscription plans)
RoomSketcher goes further by allowing you to:
- Apply materials like paint, tile, or wood
- Access a larger furniture and object library (thousands of items for RoomSketcher vs less than 100 for Polycam)
- Generate 3D Photos, 360 Views, and virtual walkthroughs
- Output a wider variety of black-and-white and colored floor plans
- Save templates of your choices for floor plan consistency
- Share projects as presentation-ready links
📏Typical Workflows:
RoomSketcher:
Import, draw, or LiDAR Capture → Edit → Generate outputs
Polycam:
LiDAR capture → Process → Edit or export to other tools
Outputs
Polycam supports additional formats for architects and contractors to bring their capture into AutoCAD, Revit, or SketchUp, as well as bring room measurement data into programs like Procore for estimating.
RoomSketcher focuses on completing the workflow within its platform. It generates high-quality JPG and PDF floor plans, along with interactive, shareable project links for presentations and client communication.
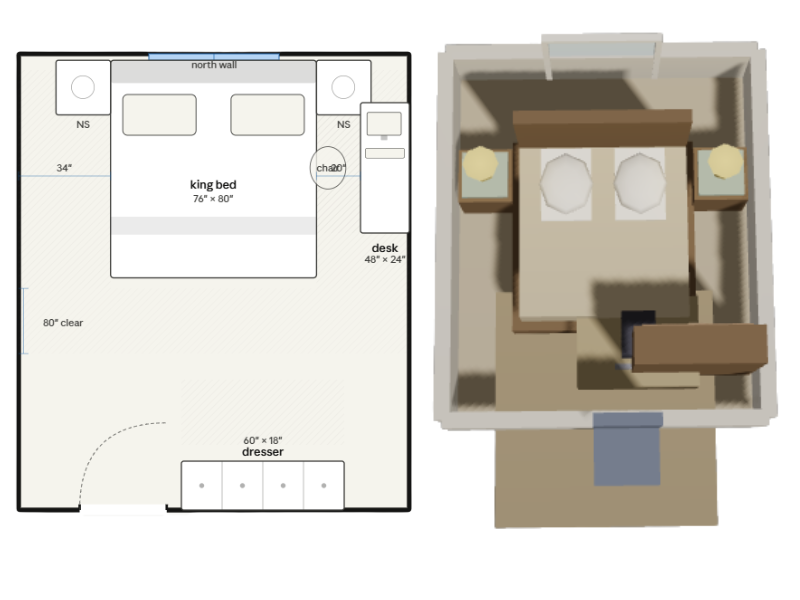
2D Floor Plans
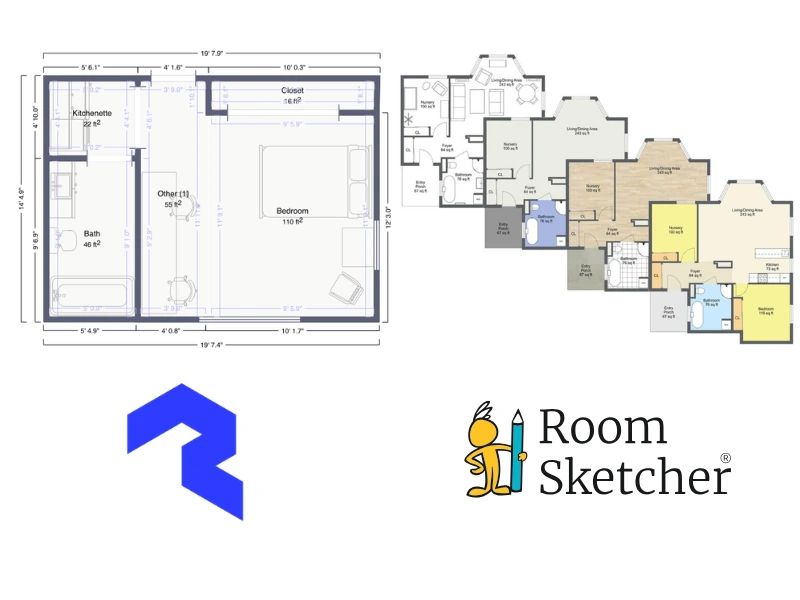
Both tools allow you to create 2D floor plans from captured spaces and easily show or hide room names, furniture, and various measurements such as room area, wall lengths, and total area.
Polycam creates 2D floor plans from a LiDAR capture. You can apply simple color themes. The downloaded output is typically a PNG or PDF and works well for documentation or technical use.
RoomSketcher offers much more flexibility. In addition to captured plans, you can create 2D Floor Plans from imported drawings or from scratch. The editor is easy to use and provides many more options to customize colors, materials, labels, measurements, and layout styles, and save templates for consistent results.
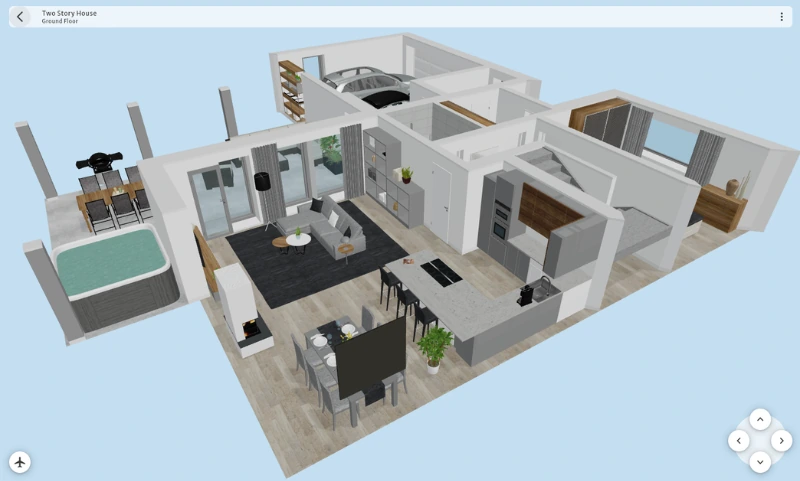
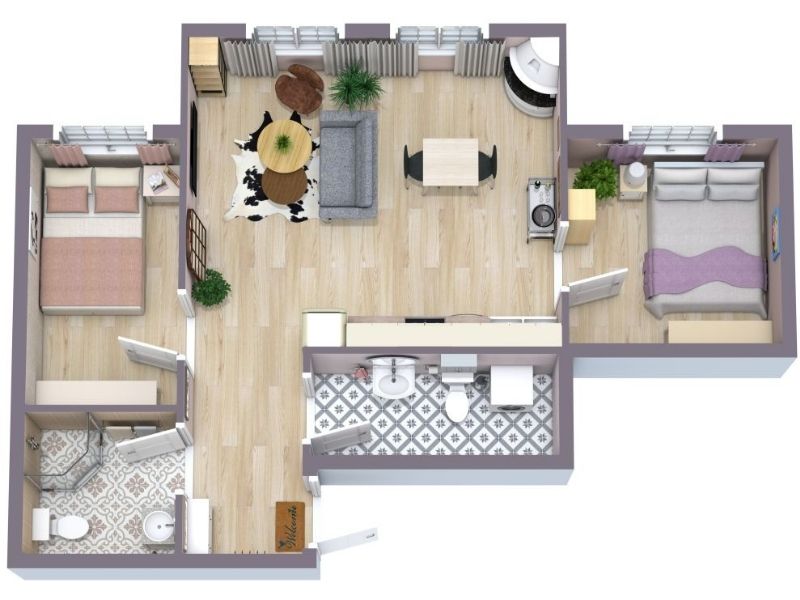
3D Floor Plans
Both tools also support 3D floor plans.
Polycam generates 3D floor plans from captured geometry, providing a quick way to understand spatial layout. These are useful for technical review but offer almost no customization.
RoomSketcher allows you to fully customize 3D Floor Plans for both existing and unbuilt spaces. You can adjust wall-top colors, floor and wall materials, and viewing angles, and generate presentation-ready outputs directly within the platform.
Project Presentations
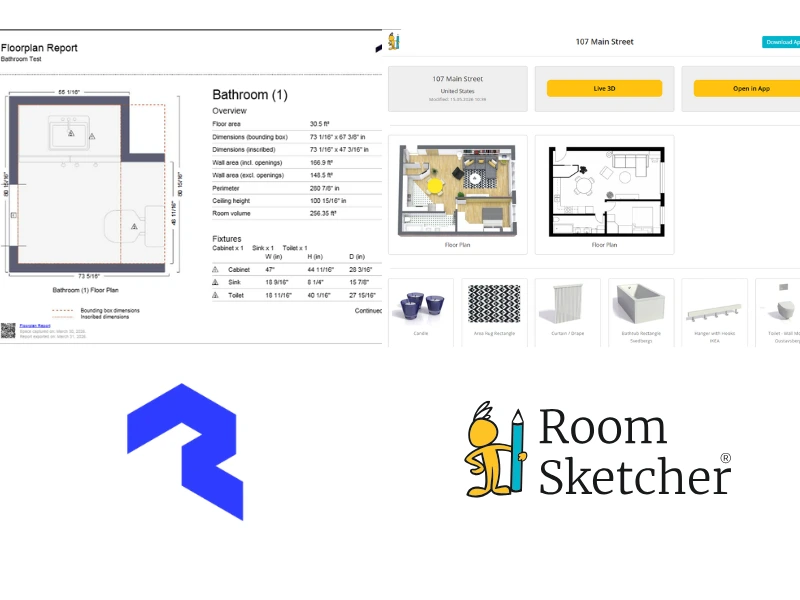
Roomsketcher includes built-in project presentations that combine all outputs into a single, shareable link. These can include 2D and 3D floor plans, 3D Photos, 360 Views, and interactive walkthroughs. This makes it easy to present projects without downloads or large files.
Polycam takes a more technical approach. Its Property Report generates a downloadable PDF with floor plans, measurements, and room-by-room data, useful for documentation and estimating.
Polycam also supports sharing and collaboration through cloud-based links, making it easy for teams to review captures. However, it does not provide the same presentation-focused experience.
3D Visualizations
The Polycam Virtual Walkthrough combines a 3D mesh of a built space with real photos you've taken. They market it as particularly useful for real estate, construction, and remote site inspections.
RoomSketcher offers a broader set of visualization tools, allowing you to create visuals for existing spaces, renovations, or unbuilt spaces.
3D Photos
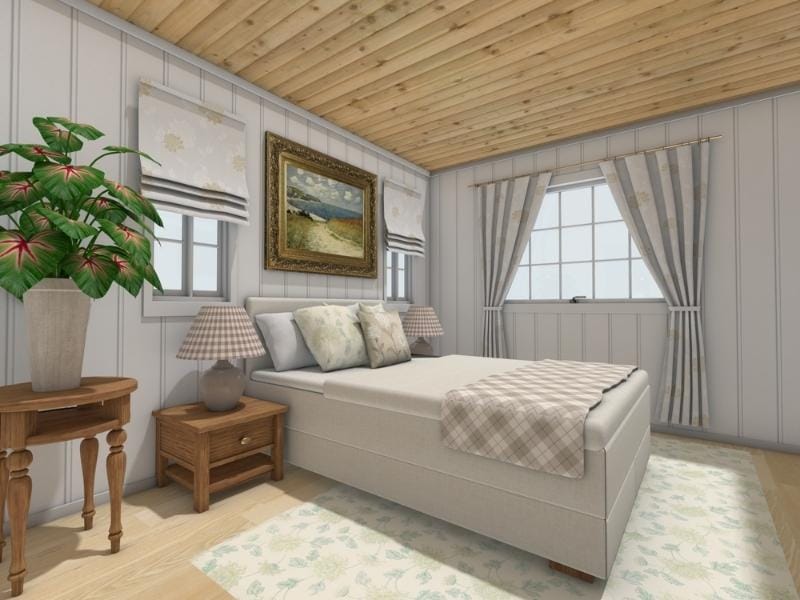
With RoomSketcher's high-resolution 3D Photos, you can generate high-quality images of rooms and entire home designs with a single click. This is ideal for interior design, home staging, and real estate projects.
360 Views
RoomSketcher's 360 Views let you turn in a room as if you were actually in the space, allowing you to turn, look up and down, and zoom in or out.
Virtual Walkthroughs
RoomSketcher's Live 3D provides an interactive virtual walkthrough of any of your projects, allowing you to fly over the floor plan for a complete overview or move through rooms as if you were physically present. This is available whether you've captured an existing space or are planning a remodel or new property.
Customer Support
Both tools offer support resources, but they differ greatly in focus and depth.
RoomSketcher provides a comprehensive Help Center, tutorials, webinars, direct chat and email support, and 1:1 training for business users. The support is focused on floor plan creation, making it easy to find relevant guidance.
Polycam offers a Help Center, tutorials, and email support, with onboarding and priority support for enterprise users. However, their self-support offerings for floor plans and editing are currently very limited. Since Polycam covers a broad range of 3D capture use cases, its Help Center and tutorials are more general, with only a small portion dedicated to floor plans.
Pricing
RoomSketcher is the more cost-effective solution, offering flexible pricing with a free plan, pay-as-you-go credits, and subscriptions. This makes it suitable for both occasional and professional users.
Polycam offers a 7-day free trial followed by a yearly subscription. To try out the editing features, you must choose a business plan.
Which Should You Choose?
Choose Polycam if:
- You want to capture real-world existing spaces and export to CAD
- You already work with Polycam or other 3D models or AEC (Architecture, Engineering, Construction) tools
- You only need a capture-first workflow
Choose RoomSketcher if:
- You want flexibility to capture, import, or draw floor plans
- You need strong editing and customization tools
- You want presentation-ready outputs without using multiple tools
- You are working on real estate, interior design, remodeling, or new construction projects
Why People Prefer RoomSketcher
- Intuitive and easy-to-use
- Capture, Convert, Draw, Trace, or Order Floor Plans
- Unmatched 2D and 3D Floor Plan customization
- Friendly customer support
- Flexible pay-as-you-go pricing
Ready to try it yourself? Create a free RoomSketcher account today and explore the features. Upgrade anytime to unlock 2D and 3D Floor Plans, 3D Photos, 360 Views, and Live 3D.
With a 30-day money-back guarantee, you can get started risk-free.
Recommended Reads
Can Claude Create Floor Plans? We Tested It
Claude can generate floor plan–like layouts from prompts, but the results quickly break down. We tested apartments, room layouts, sketch conversion, and 2D-to-3D workflows to see how well it handles real floor plan work.
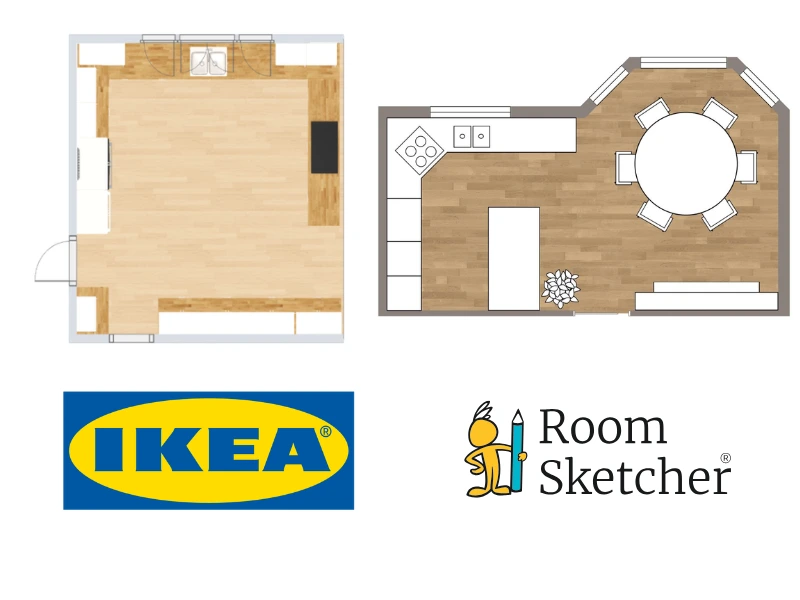
IKEA vs RoomSketcher: Which Is the Ultimate Floor Plan Tool?
IKEA and RoomSketcher are both popular options when planning a home layout. We tested both to provide a clear, side-by-side comparison to help you decide which floor plan software best fits your needs.

Top 9 Floor Plan Software Tools for 3D Floor Plans
3D floor plans turn simple layouts into realistic, easy-to-understand visual experiences. They help people explore design ideas and instantly understand a space. Here's a list of the best floor plan software to use for your 3D floor plans.